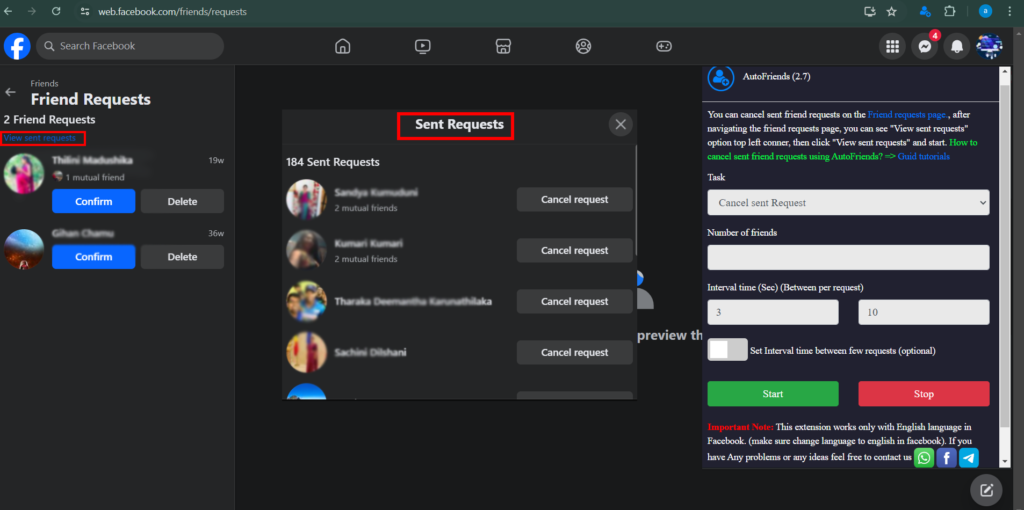
Managing friend requests on Facebook includes not only accepting incoming requests but also managing those you’ve sent. The AutoFriends extension simplifies this process by automating the cancellation of sent friend requests. This article provides a detailed guide on using the AutoFriends extension to efficiently manage and cancel sent friend requests.
Step-by-Step Guide to Using AutoFriends

Navigate to the Sent Requests Page
- Open Facebook and go to the “Friend Requests” page.
- Click on “View sent requests” to see the list of sent friend requests.
Configure AutoFriends
- Click on the AutoFriends extension icon in your browser to open the interface.
- Set up the task for canceling sent requests:
- Task: From the dropdown menu, select “Cancel sent Request”.
- Number of Friends: Enter the number of sent friend requests you want to cancel. For example, if you want to cancel 5 requests, enter “5”.
- Interval Time (Sec): Set the interval time between each cancellation. For instance, set it to 5 seconds between cancellations, and a maximum of 10 seconds.
- Additional Interval: If needed, you can set an additional interval time between a few cancellations by checking the optional checkbox and specifying the interval.
Initiate the Process
- Ensure you are on the “View sent requests” page where you can see the list of sent requests.
- Click the “Start” button in the AutoFriends interface to begin canceling sent requests. The extension will automatically cancel the requests according to your configured settings.
- If you need to stop the process at any time, click the “Stop” button.
Monitor the Progress
- Keep an eye on the process to ensure everything is functioning correctly. Adjust the settings if necessary to improve performance or address any issues.